Policy as Code with Azure API Management (APIM) and OPA
A common use case for Open Policy Agent (OPA) is to decouple authorization from the application. This enables policies and decisions to be managed centrally and lifecycled independently to the application. For application use cases, OPA can be integrated at the API Gateway, Service Mesh or Microservices layer or any combination of these.
Shifting-left on policy enforcement to the API Gateway and / or Service Mesh from the Microservice has a number of potential benefits including:
— Development teams can focus on implementing business logic and not authorization.
— Decoupled policy enforcement without changes to existing applications or development costs
— Common and consistent policy and approach across services
— Update policy out-of-band from the application
— Improved consumer experience shortcutting denied responses
— Reduce resources utilization, load and contention on the backend microservices
Azure API Management (APIM) is a platform as a service (PaaS) offering providing a management platform across hybrid and multi-cloud for the full lifecycle management of APIs. Azure APIM consists of an API Gateway, management plane and developer portal.
APIM provides the ability to configure policies to be applied at the Gateway. As described by the Azure documentation, “Policies are applied inside the gateway between the API consumer and the managed API. While the gateway receives requests and forwards them, unaltered, to the underlying API, a policy can apply changes to both the inbound request and outbound response.”
The Azure APIM policies can be used for access / limit restriction, authentication, caching, transformation and many others which are configured using XML with C# snippets and can be applied at the global, product, API or individual operation level.
However, if you’re using other cloud provider offerings and technology stacks, then typically it’s not possible to author, manage and lifecycle those policies in a centralized and consistent manner, as they’ll inevitably use a different policy definition language or approach. Additionally, there may be policy data requirements outside what’s available at the API Gateway level to write policies against.
OPA has seen huge adoption in the cloud-native space and is largely seen as the de facto standard for cloud-native authorization. OPA implements a policy language called Rego. Externalizing policy decisions to OPA and utilizing Styra Declarative Authorization Service (DAS) as the control plane and Policy Administration Point (PAP) enables the management and full lifecycle of policy in a centralized and consistent manner across the cloud native stack bringing in external data sources as required.
Azure APIM, as part of its advanced policies, allows calls to be made to external authorizers providing the ideal place to integrate OPA.
So let’s look at how OPA can be integrated into Azure APIM and ultimately used to enforce policy at the Azure API Gateway.
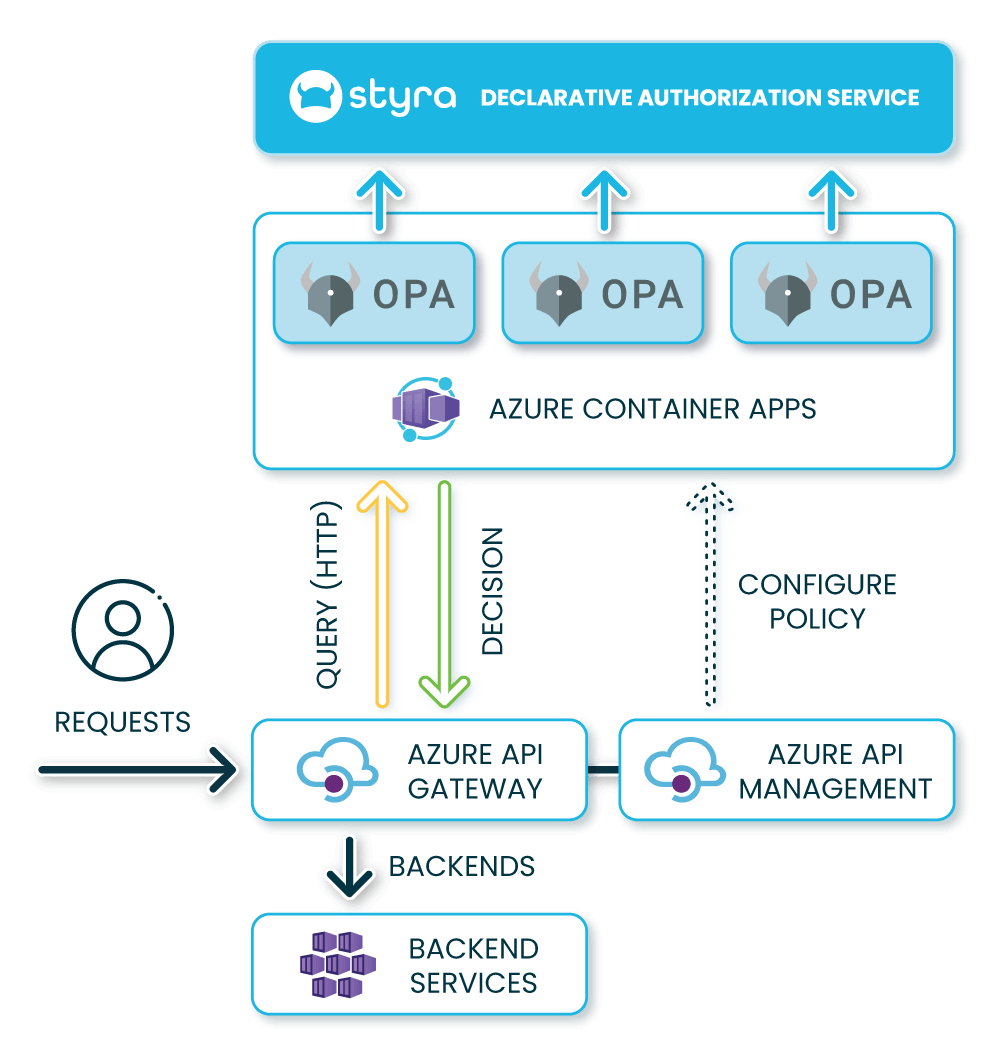
There are three distinct steps:
1. Host an OPA, acting as the Policy Decision Point (PDP), that is reachable by the Azure API Gateway.
2. Implement a policy in Azure APIM, acting as a PEP that calls OPA to get policy decisions.
3. Provide a Policy Administration Point (PAP) to define and lifecycle policy — in this case we’ll be using Styra DAS. (don’t have access? Sign up for free here).
Let’s get started using Styra DAS to create a Custom System to manage policy for Azure APIM and to get the OPA configuration. We’ll use this going forward through the article.
OPA as a Service
Hosting OPA in Azure Container Apps provides the ability to run and scale OPA containers, making them available to APIM via an HTTPS endpoint. OPA can of course be hosted in any number of ways but careful consideration should be made to host as close to the Azure API Gateway as possible to reduce latency as well as other typical considerations such as scalability, resiliency and availability.
To get up and running with Azure Container Apps follow the getting started guide. We’ll be using the yaml configuration approach so we can mount the OPA config from Azure Files.
The following is an example app.yaml file configuration (Gist link here):
type: Microsoft.App/containerApps
properties:
  managedEnvironmentId: <opa-ca-env>
  configuration:
    activeRevisionsMode: Multiple
    ingress:
      allowInsecure: false
      external: true
      targetPort: 8181
      transport: Auto
      traffic:
        - latestRevision: true
          weight: 100
  template:
    containers:
      - command:
          - /opa
          - run
          - --server
          - --config-file=/config/opa-conf.yaml
        image: docker.io/openpolicyagent/opa:0.44.0-rootless
        name: opa
        resources:
          cpu: 0.25
          memory: 0.5Gi
        volumeMounts:
          - mountPath: /config
            volumeName: apim-opa-file-volume
    scale:
      maxReplicas: 5
      minReplicas: 2
    volumes:
      - name: apim-opa-file-volume
        storageName: opa-ca-storagemount
        storageType: AzureFile
The yaml manifest uses the OPA image directly and mounts the opa configuration via a volume mount. Execution of OPA is supplied with arguments to run OPA as a server and use the mounted opa-conf.yaml:
/opa run -server --config-file=/config/opa-conf.yaml
The yaml requires the managedEnvironmentId for Container env which can be obtained by running the following setting the env vars appropriately:
az containerapp env show \
--resource-group $RESOURCE_GROUP \
--name $CONTAINERAPPS_ENVIRONMENT \
--query id
Once the Azure Files resource is created and the opa-conf.yaml has been uploaded you should be able to create the Container Apps yaml resource with substituting the env vars below:
az containerapp create \
--name $CONTAINER_APP_NAME \
--resource-group $RESOURCE_GROUP \
--environment $CONTAINERAPPS_ENVIRONMENT \
--yaml "app.yaml"
If everything worked correctly you should be able to reach the OPA page in your browser by hitting the container app URL:
https://<your-opa-app>.azurecontainerapps.ioThe default main rule defined in your Styra DAS System can be evaluated which will return false, as set by default:
$ curl https://<your-opa-app>.azurecontainerapps.io/v1/data/rules/main
{"decision_id":"5fbfa81b-4bf5-461a-8f62-7cf23b7d699e","result":false}
Now we have OPA accessible we can turn our attention to Azure APIM to configure OPA as an external authorizer.
Azure APIM Configuration
A prerequisite for exercising policy in Azure APIM is of course to have an API configured; in this case we’ll use the sample conferenceapi.
The OPA URL (and any token required) can be configured via Named values:
authorizer-url = https://<your-opa-app>.azurecontainerapps.io/v1/data/rules/allowThe external authorizer policy can then be added to Azure APIM at the global, product, API or operation level (Gist link here).
<policies>
    <inbound>
        <base />
        <set-variable name="requestId" value="@(context.RequestId)" />
        <set-variable name="serviceName" value="@(context.Deployment.ServiceName)" />
        <set-variable name="originalUrl" value="@(context.Request.OriginalUrl.ToString())" />
        <set-variable name="authorization" value="@(context.Request.Headers.GetValueOrDefault("Authorization"))" />
        <set-variable name="uriSegments" value="@(JsonConvert.SerializeObject(new Uri(context.Request.Url.ToString()).Segments))" />
        <choose>
            <when condition="@((bool)context.Request.HasBody)">
                <set-variable name="requestBody" value="@(context.Request.Body.As<string>(preserveContent: true))" />
            </when>
        </choose>
        <send-request mode="new" response-variable-name="response" timeout="10" ignore-error="false">
            <set-url>{|{opa-authorizer-url}}</set-url>
            <set-method>POST</set-method>
            <set-body template="liquid">
            {
                "input": {
                    "request": {
                        "headers": {
                            "host": "{|{context.Request.Url.Host}}",
                            "authorization": "{|{context.Variables["authorization"]}}"
                        },
                        "parsed_path": {|{context.Variables["uriSegments"]}},
                        "path": "{|{context.Request.Url.Path}}",
                        "port": "{|{context.Request.Url.Port}}",
                        "scheme": "{|{context.Request.Url.Scheme}}",
                        "query_string": "{|{context.Request.Url.QueryString}}",
                        "url": "{|{context.Request.Url.ToString}}",
                        "method": "{|{context.Request.Method}}",
                        "request_id": "{|{context.Variables["requestId"]}}"
                        {% if (context.Request.HasBody) %},
                        "body":  {|{context.Variables["requestBody"]}}
                        {% endif %}
                    },
                    "apim_name": "{|{context.Variables["serviceName"]}}",
                    "original_url": "{|{context.Variables["originalUrl"]}}"
                }
            }
            </set-body>
        </send-request>
        <choose>
            <!-- Return status code if non-200 status from OPA -->
            <when condition="@(((IResponse)context.Variables["response"]).StatusCode != 200)">
                <return-response>
                    <set-status code="@(((IResponse)context.Variables["response"]).StatusCode)" reason="@(((IResponse)context.Variables["response"]).StatusReason)" />
                </return-response>
            </when>
        </choose>
        <set-variable name="decisionJson" value="@(((IResponse)context.Variables["response"]).Body.As<JObject>())" />
        <choose>
            <!-- If result is not returned in response then request denied, return 403 -->
            <when condition="@(!((JObject)context.Variables["decisionJson"]).ContainsKey("result"))">
                <return-response>
                    <set-status code="403" reason="Forbidden" />
                </return-response>
            </when>
        </choose>
        <set-variable name="allow" value="@(((JObject)context.Variables["decisionJson"])["result"].ToString())" />
        <choose>
            <!-- If result is returned and not true then request denied, return 403 -->
            <when condition="@(((string)context.Variables["allow"]).ToLower() != "true")">
                <return-response>
                    <set-status code="403" reason="Forbidden" />
                </return-response>
            </when>
        </choose>
    </inbound>
    <backend>
        <base />
    </backend>
    <outbound>
        <base />
    </outbound>
    <on-error>
        <base />
    </on-error>
</policies>
Here we’re configuring for inbound evaluation, capturing the request and passing to OPA via the HTTP call. If a denied response (result != true or no result) is received from OPA then an HTTP 403 Forbidden status code is returned. If the OPA call was not successful (non-200) then return the status code and reason. Otherwise the Azure APIM will continue its execution and ultimately call the configured backend.
Policy Implementation
Before testing the Azure APIM configuration we need to update the policy as we’ve configured Azure APIM to execute the allow rule rather than the default main created out of the box by Styra DAS.
Whilst updating the rule naming let’s implement a more interesting policy which enforces any feedback on the conference sessions comes from authenticated users (so user names can be logged against the feedback in the backend, for example) (Gist link here):
package rules

import future.keywords.if

default allow = false

# allow everything unless denied
allow if not deny

# deny feedback posts without a valid JWT
deny {
  input.request.method == "POST"
  input.request.parsed_path[3] == "feedback"
  not claims
}

# Decode and verify the JWT and get claims
claims := payload {
  [valid, _, payload] := io.jwt.decode_verify(bearer_token, data.secret)
  valid
}

# Access the JWT in the bearer token
bearer_token := t {
  v := input.request.headers.authorization
  startswith(v, "Bearer ")
  t := substring(v, count("Bearer "), -1)
}
The Deny rule checks that POST requests to the session feedback endpoint have a valid JWT token configured. All other requests are allowed. (Note: Want to take it a bit further? How about extending the policy to check the user against the conference session attendee list, which could be external data provided in a Styra DAS datasource?).
Now we have everything configured we can test the full flow from the Azure APIM UI or via API:
curl -X POST -H 'Ocp-Apim-Subscription-Key: <key>' -H 'Authorization: Bearer <JWT Token>' https://<apim-instance>.azure-api.net/conference/sessions -d '{"message":"Great session!"}' -iIf everything worked correctly, you should see an HTTP 200. Of course with any test you’ll want to make sure the opposite is true by removing the bearer token to test the HTTP 403 deny case. Styra DAS provides an easy way to test directly within the platform by modifying inputs and previewing results and also writing unit tests to ensure expected policy behavior before pushing out to OPA.
Performance
Performance testing is often high on the agenda with services in the critical path. The full end-to-end latency of calling OPA from the API Gateway can be checked by running a trace in the Azure APIM portal. The send-request to OPA should typically show around 3ms (assuming OPA and Azure APIM are hosted in the same region). From Styra DAS you can check the decision logs to see the latency of policy evaluation, which for the sample policy here should show under 1ms (typically around 250 microseconds). Therefore, most of the latency is in brokering the HTTP call but still this is very small and likely to not be of concern for most applications.
Summary
We’ve covered how to host OPA in Azure Container Apps, configure the Azure APIM Gateway to externalise the policy decisions to the hosted OPA and written policy in Styra DAS. Enforcing policy at the gateway enables shifting left to the infrastructure layer without needing to modify downstream applications. Integrating with OPA enables the implementation of “policy as code” at the API Gateway and across the tech stack, whilst evaluating decisions close to the enforcement point for better latency performance. Styra DAS acts as the control plane for OPA and provides the ability to fully lifecycle policy centrally and in a common and consistent approach across the technical stacks that use OPA.
We’ve only touched the surface on what’s possible with policies. Styra DAS and OPA can enforce entitlements with RBAC, ABAC and PBAC along with infrastructure guardrails and a whole host of fine-grained business, regulatory and technical policies.
Want to learn more?
Check out Styra Academy for free courses including OPA Policy Authoring and OPA Performance. The Styra docs and Open Policy Agent also have great resources with examples and you can get up and running on Styra DAS for free which has a whole host of Getting Started wizards to get you up and running quickly, enjoy!
Any questions? Looking to implement policy as code or maybe just want to discuss your situation and what’s possible? We’d love to hear from you.